

There are no more items in your cart
Complete guide: How to take a screenshot on different devices
Basics: How to take a screenshot
Taking a screenshot is a simple activity that can be extremely useful in many situations. The screenshot option allows you to capture the image displayed on your device's screen, allowing you to save, edit or share it. How do you take a screenshot? First, specify whether you want to create a screenshot of the entire screen or a selected area or active window. Then use the appropriate combination of buttons or tools depending on your device and operating system. A preview of the screenshot will appear in the lower-left corner of the screen. Finally, find the saved screenshot in the appropriate folder or application, ready to edit or share.
How to take a screenshot on a computer: step by step
You can easily take a screenshot on a laptop and computer by using the appropriate button combinations for your operating system. On Windows computers, the Print Screen (PrtSc) key is most commonly used. On Mac , the key combination Shift + Command + 3 takes a screenshot of the entire screen, and Shift + Command + 4 allows you to select a portion of the screen. How to take a snapshot of all open windows on the computer and save them as separate image files? Here you can use tools such as Snagit or Lightshot.
Key combination for screenshot: A Beginner's Guide
Depending on your operating system, the key combinations for a screenshot may vary. Here are some examples:
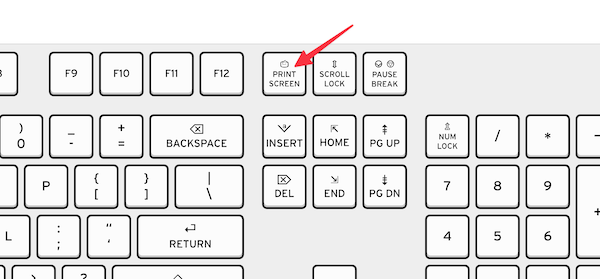
- Windows: The Print Screen key saves an image of the entire screen to the clipboard.
- iOS/iPadOS (iPhone/iPad): Pressing the Volume Up + Power button at the same time.
- Android: Hold down the volume down + power button at the same time.

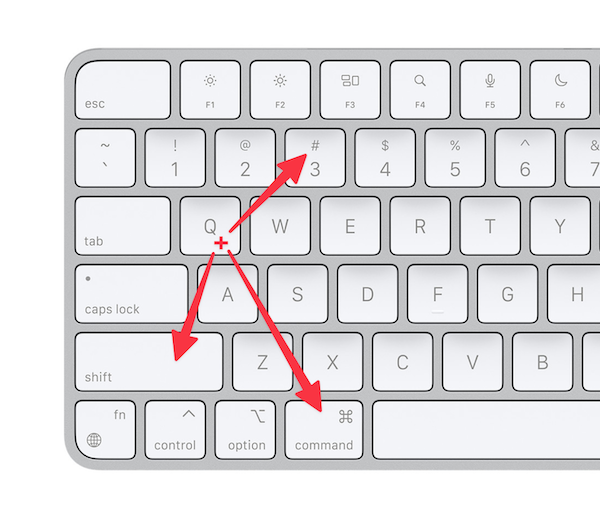
- MacOS: Shift + Command + 3 for the whole screen or Shift + Command + 4 for part of the screen.
- Linux: Usually used Print Screen key or "Shift + PrtSc" for various screenshot options.
Screenshot in different operating systems
Each operating system offers different methods and tools for creating screenshots. Windows, macOS, iOS, Android and Linux all have their own unique key combinations and screen capture tools.
Take a screenshot on a Windows laptop: How to do it?
To create a screenshot on Windows, you can use the "PrtSc" key, which is short for print screen in windows. After pressing the key, the screen image will be saved to the clipboard. You can then paste it into a graphics program or document using the Ctrl + V key combination.
How to take a screenshot on a macOS laptop?
On a macOS laptop, taking a screenshot is easy with a combination of keys. Understanding how to take a screenshot on a laptop can be very useful for various purposes, such as creating documentation, reporting bugs or sharing information with others. Shift + Command + 3 saves a screenshot of the entire screen, while Shift + Command + 4 allows you to select a portion of thescreen.
How to take a screenshot on Apple devices?
The gesture of taking a screenshot on Apple devices is simple and intuitive. Whether you're using an iPhone, iPad or Mac, each platform offers easy methods to take an Apple screenshot.
How to take a screenshot on an iPhone
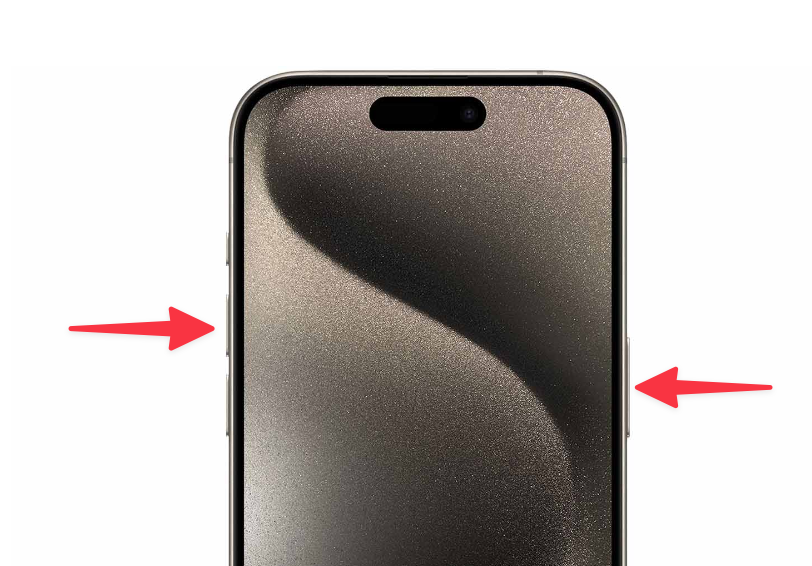
To take an Apple screenshot on an iPhone with Face ID (iPhone X and newer), press the side button and volume up button at the same time, then quickly release them. A thumbnail Apple screens hot will appear in the lower-left corner of the screen. The screenshot will be saved in the Photos app in the "Screenshots" album. On iPhones with a Home button (iPhone 8 and older), press the side (or top) button and the Home button at the same time, then quickly release them.
How to take a screenshot on an iPad
On an iPad without a Home button (iPad Pro, iPad Air 4 and newer), press the top button (power button) and volume up button at the same time, then quickly release them. On iPads with a Home button (older iPad models, iPad Mini), press the top button (power button) and the Home button at the same time, and then quickly release them. This method works as a print screen iPad and allows you to quickly capture the desktop.
How to take a screenshot on Mac
On a Mac, taking an Apple screens hot is just as simple. To take a screenshot of the entire screen, press Shift + Command + 3. If you want to capture only a selected portion of the screen, use Shift + Command + 4, then drag to select the area of the screen you want to capture.
Advanced screen capture techniques allow you to capture the desktop of active windows, as well as editing and annotation. These allow you to tailor the screenshot more precisely to your needs
How to take a screen of part of the screen: Practical tips
Windows
To take a screen of part of the screen on Windows, open the Clipping Tool from the Start menu, select "New" and select the area of the screen you want to capture. You can also press Windows + Shift + S, which will darken the screen and allow you to select the area to be captured. Where will such a screen slice be saved? The screenshot will be saved to the clipboard and you can paste it into a graphics program.
macOS
How to take a screen of a part of the screen on macOS? Press Shift + Command + 4 at the same time. The cursor will change to a crosshair, which you use to mark the area of the screen you want to capture. The screenshot will be saved on the desktop.
Linux
On Linux, press Shift + PrtSc at the same time, then select the screen slice you want to capture. The screenshot will be saved in the screenshot directory. On the other hand, to take a screenshot of the active window on a Windows computer, press Alt + PrtSc to take a screenshot of the active window. On macOS, use Shift + Command + 4, then press Spacebar and click on the window you want to capture.
Where it saves the screenshot automatically: Locating screenshots
Finding screens hots on your computer can be easy if the screenshots are automatically saved to a specific folder. Screenshots taken on WIndows are usually saved in the "Screenshots" folder in the Images library. On macOS, finding screens hots is easy because all screenshots are saved to the desktop, unless the settings have been changed.
To make it easier to find screenshots, it's a good idea to set specific save locations so you can access them quickly and easily when needed. It's also good practice to review and organize these files on a regular basis, so you can better find screenshots in the future. Capturing your desktop and locating screenshots are key skills to effectively manage saved images on your computer.
How to edit a screenshot: Simple tricks
You can use built-in tools such as Paint on Windows or Preview on macOS to edit screenshots. You can add text, draw lines and highlight important elements in the image.
Saved screenshot: How to find it and what to do next?
Once you have saved the screenshot, you can find it in the appropriate folder and open it with a graphic editor. You can also upload it to the cloud or share it on social media.
There are many benefits tousing a screenshot in various fields and situations. Screenshots allow you to accurately capture the content visible on the screen, which is especially important when illustrating steps in instructions or technical documentation. In day-to-day work, the gesture of taking a snapshot allows you to quickly and efficiently share information with your team. You can easily show what is visible on the screen, which greatly speeds up troubleshooting and decision-making.
Using a screenshot to create presentations allows you to quickly present accurate visual information, which increases audience understanding and interest. When reporting software bugs, screenshots are indispensable because they allow you to show exactly where and how the problem occurs, making it easier to identify and fix.
Screenshots can be used to archive important information, such as payment confirmations, configuration settings, or other relevant data that may be needed in the future. In educational materials, the use of a screens hot helps to better illustrate the topics being discussed, making it easier to learn and remember information. Instead of manually transcribing the information, you can quickly take a screenshot, which saves time and reduces the risk of errors.
Posted in:
Guides
Related posts
 Ringke Slim case in daily use - how does it perform?
For the past few weeks I have had the pleasure of testing the Ringke Slim case. It is one of the slimmer and more...
Read more
Which glass for Galaxy S21 Ultra to choose?
Find out how to protect the unearthly screen on the Galaxy S21 Ultra
Read more
Guess Sleeve bag - opinion after 3 months of use
Wondering how the original Guess bag stands up to daily use?
Read more
Women's case for Women's Day
In March, we celebrate International Women's Day. On this occasion, we decided to take a closer look at the offer of...
Read more
Which case for the Samsung Galaxy A52 should I choose?
The Samsung Galaxy A51 was hugely successful, if you are considering buying its successor, the A52 you should...
Read more
Leave a comment